Best Banana Muffins – Vegan style

These banana muffins never disappoint! I adapted this lower sugar version of the Muffin Mania Banana Muffins in the 80’s and have been making them probably every month since in one version or another. When I had to switch to gluten-free flour they made the transition almost seamlessly. With my flour mix and a teaspoon of xanthan gum I am not afraid to take them to the shop for coffee break (especially if I make the chocolate chunk version). So when my niece was coming for a visit and I had some nice ripe bananas (the secret ingredient) I thought I would try them with a flax egg substitute to suit her vegan diet. I was not disappointed – they were great with fresh and dried cranberries for added flavour. I would make these if I were out of eggs anytime!

Vegan Banana Cranberry Muffins – for pdf version click here Vegan Banana Muffins

1 Tbsp ground flax seed*
2 1/2 Tbsp water *
1 1/2 cups all purpose gluten-free flour
1 tsp xanthan gum
1/2 cup white sugar
1 tsp GF baking powder
1 tsp baking soda
1/2 tsp salt
3 very ripe bananas, mashed, about 1 1/4 cups
1/3 cup margarine or butter, melted
3/4 cup fresh, frozen or dried cranberries or combination

* the flax and water replaces one egg – if you are not vegan you may use an egg instead

  • Whisk water into flax seed in a small bowl and let sit while preparing rest of ingredients (at least 5 minutes) until thickened.
  • Sift flour, xanthan gum, sugar, baking powder, baking soda and salt in a bowl.
  • Stir flax mixture and margarine into bananas until blended then pour over sifted dry ingredients.
  • Add cranberries and mix until evenly distributed.
  • Fill paper-lined muffin pans using a 1/4 cup measure or a 2 1/4 ounce scoop for 9 large muffins or a 7/8 oz scoop for 30 mini-muffins.
  • Bake at 365°F for 25 minutes (less for mini-muffins)until muffin springs back when lightly touched.
Advertisement

Triple Chocolate Cookies

If you are looking for a gluten-free cookie to make this March break and you like a little chocolate then these Triple Chocolate Cookies should be a hit. They took very little experimentation to come up with a gluten-free version of the original recipe. I just switched my gluten-free all purpose flour mix for both the wheat flours and added 1 teaspoon of xanthan gum and 1 Tablespoon of sour cream.

I made a double batch so I could share but they were so good they disappeared before they could be delivered to the deserving parties!
IMG_9861

Triple Chocolate Cookies Triple Chocolate Cookies GF2014
These are a hit with the chocolate lovers and I have found they disappear quickly from a plate of assorted cookies. You can bring these to a party and not have to apologize for being gluten-free!

1 cup margarine or butter or a mixture
3/4 cup brown sugar, packed
1/2 cup white sugar
1 egg
2 tsp vanilla extract
1 tsp instant coffee granules (optional)
2 Tbsp sour cream, yogurt or milk
2 cups GF all purpose flour
1 tsp xanthan gum
1/2 cup cocoa powder
1 tsp baking soda
1/2 tsp salt
1 cup white chocolate pieces
1 cup semi sweet chocolate pieces
1/2 cup pecans, chopped

• Beat margarine with both sugars until smooth, being careful not to over mix.
• Add egg, vanilla, coffee and sour cream, beating until incorporated.
• Sift flour, xanthan gum, baking soda, salt and cocoa powder into sugar mixture and beat until smooth. .
• Add white and dark chocolate and pecans, stirring until evenly distributed.
• Drop by dessert spoon or 7/8 oz scoop onto an ungreased cookie sheet and flatten slightly with the palm of your hand.
• Bake for 10 -12 minutes at 365°F.
• They are done when the tops begin to crack and centres are somewhat set but still a little soft.
• Hide until needed!

Makes 3 1/2 dozen cookies
Anne’s Favourites, Food for the Heart and Soul

Turtle Squares

These are probably the most widespread “favourite” on the treat side of my cookbook. And why not with a combination of chocolate and caramel you appeal to twice as many people! I always make a bakery size pan at Christmas so I have some for home and enough to share at Cliff’s Plumbing & Heating during the last work days. How nice for me and other people with Celiac Disease they are easily changed up to leave out the gluten!

Turtle Square Recipe Page 185 Coming Soon to the blog

Turtle Square Recipe Page 185 Also see Holiday Date Balls posted last year!

Turtle Squares

These are just about the most delicious, crowd-pleasing squares you can make. Doreen concocted this recipe by combining a Nanaimo bar base and Wellington square filling – twice the enjoyment! I have included the recipe for the larger

Base: 
1/2  cup melted margarine
1/4  cup cocoa powder
1/4  cup white sugar
1  egg, beaten tsp vanilla extract
2 1/4  cups GF graham crumbs – I sometimes use part GF crisp rice cereal crushed
1  cup desiccated coconut
Filling: 
1  can (300 ml) sweetened condensed milk
3/4 cup brown sugar, packed
2/3 cup melted margarine
2 Tbsp corn syrup
1 cup pecans, coarsely chopped

Topping:
1 cup semi-sweet chocolate chunks
1/4 cup margarine

  • For base mix margarine, cocoa, sugar and egg in microwaveable bowl and cook about
  • 1 minute, stopping to stir half way through, until mixture is bubbling. Do not overcook or crumbs may not stick together.
  • Stir in vanilla, graham crumbs and coconut until evenly distributed. Crumbs should stick
  • together nicely or they will not cut properly later.
  • Press into a 9 x 13 inch pan and let cool.
  • For filling cook condensed milk, brown sugar, margarine and corn syrup in a heavy pot over medium low heat until mixture comes to a full boil, stirring frequently. If bits of brown start forming on the bottom, turn down the heat a notch and don’t worry since mostly they will mix in as the rest browns.
  • Reduce heat slightly and boil 5 minutes stirring constantly. It will take a little longer to cook the filling for the larger pan. Caramel is done if spoon is leaving a clean path on the bottom of the pot for a second and mixture is a nice golden brown
  • Let cool slightly then spread on base and sprinkle pecans evenly over the surface, pressing in slightly.
  • Refrigerate for an hour or more until set.
  • For topping microwave chocolate and margarine together on low power, about 1 minute, stopping often to stir and check the chocolate. Chocolate can burn easily. I usually take it out when there are still a few lumps remaining and stir until they melt, returning to microwave only if necessary.
  • Spread over cooled caramel layer with a spatula.
  • Cool and cut into 35 squares.
  • If the caramel is hard when refrigerated you may need to serve the squares at room temperature.

Beef Lentil Soup

Beef Lentil Soup

Beef Lentil Soup

When I was told my folate level was low I made a visit to the dietitian to see what advice she had and she printed me the list of Food Sources of Folate from the Dietitians of Canada http://www.dietitians.ca/Your-Health/Nutrition-A-Z/B-Vitamins.aspx?categoryID=3n.  I looked it over to see where I could bump up my intake. I noticed spinach was a good source and assumed kale had a similar vitamin profile so thought I would keep hiding it anywhere I could (soups and stews and salads). She also mentioned that beans and lentils were a good source. It just happened I had put on a soup bone for some beef soup that morning and I was wondering what might be a good gluten-free substitute for the barley and now I had the perfect solution – lentils. The soup made a delicious vehicle to add some folate rich lentils and greens.

For me this is a two day process – the first day leaving the soup bone on in the slow cooker and the next day putting together the soup but you could finish the soup at night and still have it for dinner. It is definitely hearty enough for an evening meal but it is also a great boost at midday if you freeze it in lunch size containers. Soup is my solution to a gluten-free lunch since I often feel I need more than a salad to get me through the day.

Beef Stock
If you can find a source of nice meaty beef bones and you own a slow cooker you will never want to use dry bouillon mix again. The ingredients below are the basics, but feel free to use almost any vegetables or herb you like. Just a little advice that I learned the hard way. Avoid vegetables with really strong tastes like broccoli and cauliflower. At times I like to add cabbage, kale and turnip, but not so much that it overpowers the other flavours.

12 – 14 cups water
2 lb soup bone or pot roast with bone in or stewing beef
1 large onion or several small ones, peeled
1 rib celery with leaves
1 parsnip, cut in chunks
1 carrot, cut in chunks
1 – 2 tomatoes, cut in quarters
1 tsp salt
1 whole hot pepper or 5 whole peppercorns
1 clove garlic
2 bay leaves
a handful of kale ribs (use the leaves for salad) if you have them
Any other vegetable, avoid strongly flavoured ones

  • Put everything together in slow cooker and cook on high for 5 hours or let cook on low all day or overnight.
  • If simmering on top of stove brown beef before adding water and simmer 2 – 3 hours.
  • Strain stock and remove meat from soup bone when it cools enough.
  • Add meat back to stock and discard bones and cooked vegetables.
  • Refrigerate stock and discard fat from top of container before reheating.
  • You may save some of the fat for “sweating” the vegetables in your soups.

Beef Lentil Soup
On a stormy winter day this is a very welcoming smell to come home to. It definitely is a meal in itself but even better with some biscuits or toast..
Beef Stock with meat (recipe above)
1/2 – 1 cup lentils, I use green
1 large onion, chopped
1 tsp olive oil
1 cup celery, chopped
2 cups carrots, chopped
1 clove garlic, crushed
1 potato, peeled and cubed
1 cup rutabaga, cubed
1 can (28 oz) tomatoes or 3 cups tomatoes, peeled and chopped
2 cups corn kernels
1 tsp salt, or to taste
1/4 tsp pepper
1 cup kale leaves and stems, chopped
1 Tbsp parsley

  • Prepare beef stock as per recipe adding meat to stock.
  • Simmer lentils with beef stock while you prepare the remaining vegetables.
  • Cook onion with olive oil in large stock pot until soft, about 5 minutes.
  • Add celery, carrots and garlic and continue cooking on low for another 5 to 10 minutes.
  • Add potato, rutabaga, stock and meat and cook 20 minutes until lentils are soft.
  • Stir in tomatoes, corn, parsley, salt and pepper and bring to a boil.
  • Simmer for 30 minutes.
  • Taste and adjust seasonings.

Pumpkin Chiffon Cake (gluten-free)

Cake with Brandy Cream

Halloween Week is always busy because both my Mother and Mother-in-Law have their birthdays a day apart. That means two cakes, a trip to Guelph to deliver my Mom’s and of course Maple fudge for Halloween trick or treaters. I was excited to share a blog on Maple fudge for the bazaar and Christmas giving season but it will have to wait because when I made the gluten-free version of the Pumpkin Chiffon Cake for Mom I just could not wait to show you how gorgeous it was! I wish I could give you a piece so you could taste it too!

This recipe came from Wilma Chisholm and I cannot say I have seen it anywhere else in print. This was one of Mom’s favourite cakes and without the need for a sugary icing she was able to indulge in a small piece for her birthday even after she developed diabetes. As the photos show she can still count it as a favourite when it is made with a simple substitution of my gluten-free all purpose flour.

Pumpkin Chiffon Cake

Pumpkin Chiffon – click here for pdf version of recipe

7 eggs, separated
1/2 tsp cream of tartar
1 1/2 cups white sugar
1/2 cup water, apple cider or juice drained from pumpkin
when preparing purée (recipe pg 232)
1/2 – 3/4 cup pumpkin purée, fresh, frozen or canned
1/2 cup canola oil
2 cups GF all purpose flour
1 tsp xanthan gum
2 tsp baking powder

  • Whip egg whites with cream of tartar in a clean bowl with clean beaters on high until foamy then slowly add 3/4 cup sugar while beating until stiff peaks form.
  • In another bowl beat egg yolks, remaining 3/4 cup sugar and water about 5 minutes until yolk mixture is thick, pale and beaters leave marks.
  • Fold pumpkin and oil into egg yolk mixture.
  • Sift flour, xanthan gum and baking powder and stir into yolk mixture until smooth.
  • Pour egg yolk mixture over the beaten egg whites and fold together quickly but thoroughly.
  • Immediately pour into an ungreased tube pan and bake at 350°F for about an hour until cake springs back when lightly touched and is golden brown.
  • If cake is getting too brown before it is completely cooked then turn oven down to 325°F for remaining time.
  • Invert pan on rack and cool completely.
  • Serve with brandied cream on the side.

Brandied Cream: I’m sure you will find somewhere to use any of this left over.

  • 2 cups whipping cream
  • 1/3 cup brown sugar, packed
  • 2 tsp brandy

Romanian Peppers

Romanian Peppers
I can’t believe I did not add this annual treat to my repertoire sooner. It showcases summer’s bounty of tomatoes and peppers in a surprisingly simple combination. I’m certain to freeze several dinners of stuffed peppers for a night off dinner preparation and a reminder of the September harvest. They are unbelievably good when you strain some fresh tomato juice to cook them in! Tomato Juice – printable recipe

The recipe is essentially gluten-free which is even better. I leave out the flour altogether but I prefer a thinner soup. When I made my tomato dill soup today I substituted rice flour thinking it might balance some of the acid and I think it does.

Romanian Peppers 017

Cliff grows these amazingly prolific Jumbo Stuff Peppers from Stokes seeds. Check out the size of the peppers this year!

http://www.stokeseeds.com/product.aspx?ProductID=39660&CategoryID=117

Romanian Stuffed Peppers

Romanian Peppers – click here for pdf version of recipe
This recipe came from Maria Olariu and is a Romanian favourite I’m glad she shared with us. When they eat this hearty main dish they cut open the peppers and eat the meat filling, discarding the pepper shell which has already flavoured the dish. We usually just cut the pepper shell and meat filling altogether into the soup.

8 – 10 medium peppers, thin walled work best*
1/4 cup rice, converted long-grain
1 medium onion, minced
1 lb lean ground beef, pork or chicken
2 eggs
1/2 tsp paprika
1/2 tsp salt
freshly ground black pepper

Sauce:
2 cups tomato juice or 1 can (5.5 oz) tomato paste with water to give 2 cups
enough water to cover peppers
1/4 tsp marjoram
1 Tbsp fresh parsley, chopped
3 Tbsp rice flour
2 Tbsp cold water

  • Wash and core peppers.
  • Invert and drain while preparing stuffing.
  • To make the stuffing, mix the ground meat with the rice (uncooked), minced onion, salt, pepper and eggs until evenly combined.
  • Stuff the peppers with the prepared mixture.
  • Place the peppers upright in saucepan large enough for the peppers to fit snugly with room above for broth. I use a 4 qt, 8 inch diameter pot with a lid.
  • Pour the tomato juice or paste with water over the peppers in the pot. You may add a little water to cover the peppers but I use only juice.
  • Bring to a boil and simmer on low heat for about 45 – 50 minutes.
  • Stir in parsley and marjoram.
  • Whisk cold water with flour until smooth, stir into tomato broth and cook 5 minutes to thicken if desired.
  • Serve in a bowl with tomato broth overall. Cut peppers open and remove outer pepper shell according to your preference.

Chocolate Zucchini Cupcakes

 
Chocolate Zucchini Cupcakes
 
Cupcakes by Anne's Favourites
Chocolate Zucchini Cupcakes – GF
The credit for this winning recipe goes to Sue Bellmore who shared this via the St. Mary’s CWL cookbook. We sold this as a cake at the bakery and it elicited a wedding proposal from one octogenarian! Amazingly this translates into a gluten-free version that is every bit as fantastic.
Cupcakes, a photo by Anne’s Favourites on Flickr.

I read on someone’s blog they drizzled caramel on top of their chocolate cupcakes with butter icing and I just happened to have some of the Vanilla Bean Salted Caramel Sauce from Barefeet in the Kitchen so I tried that   http://barefeetinthekitchen.blogspot.ca/2013/05/vanilla-bean-salted-caramel-sauce-recipe.html. It was a match made in heaven! 

Use the Wilton 1M tip to make frosting cupcakes a breeze! 

Chocolate Zucchini Cupcakes – click here for pdf version of recipe

Gluten-free version

1/2 cup canola oil
1/2 cup margarine
1 3/4 cups white sugar
3 eggs
2 tsp vanilla extract
2 1/2 cups GF all purpose flour
1/2 tsp GF baking powder
2 tsp baking soda
1 1/2 tsp xanthan gum
1/2 cup cocoa powder
1/2 cup yogurt, buttermilk or sour milk
2 cups grated zucchini, unpeeled
1/4 cup chocolate chips

  • Beat oil, margarine, sugar, eggs and vanilla until light.
  • Stir in yogurt.
  • Sift flour, baking powder, baking soda, xanthan gum and cocoa into egg mixture and beat until combined.
  • Scrape sides and stir in zucchini and chocolate chips then beat for 2 minutes.
  • Fill paper line muffin cups using a quarter cup or a 2 1/4 ounce scoop filled just to level. If you overfill the cupcake tops will be large and difficult to frost and transport.
  • Bake at 350°F for about 30 minutes, until cupcake springs back when lightly touched, and internal temperature has reached 220°F .
  • Makes 22 -24 cupcakes

Strawberry Pavlova

Pavlova Mmmm

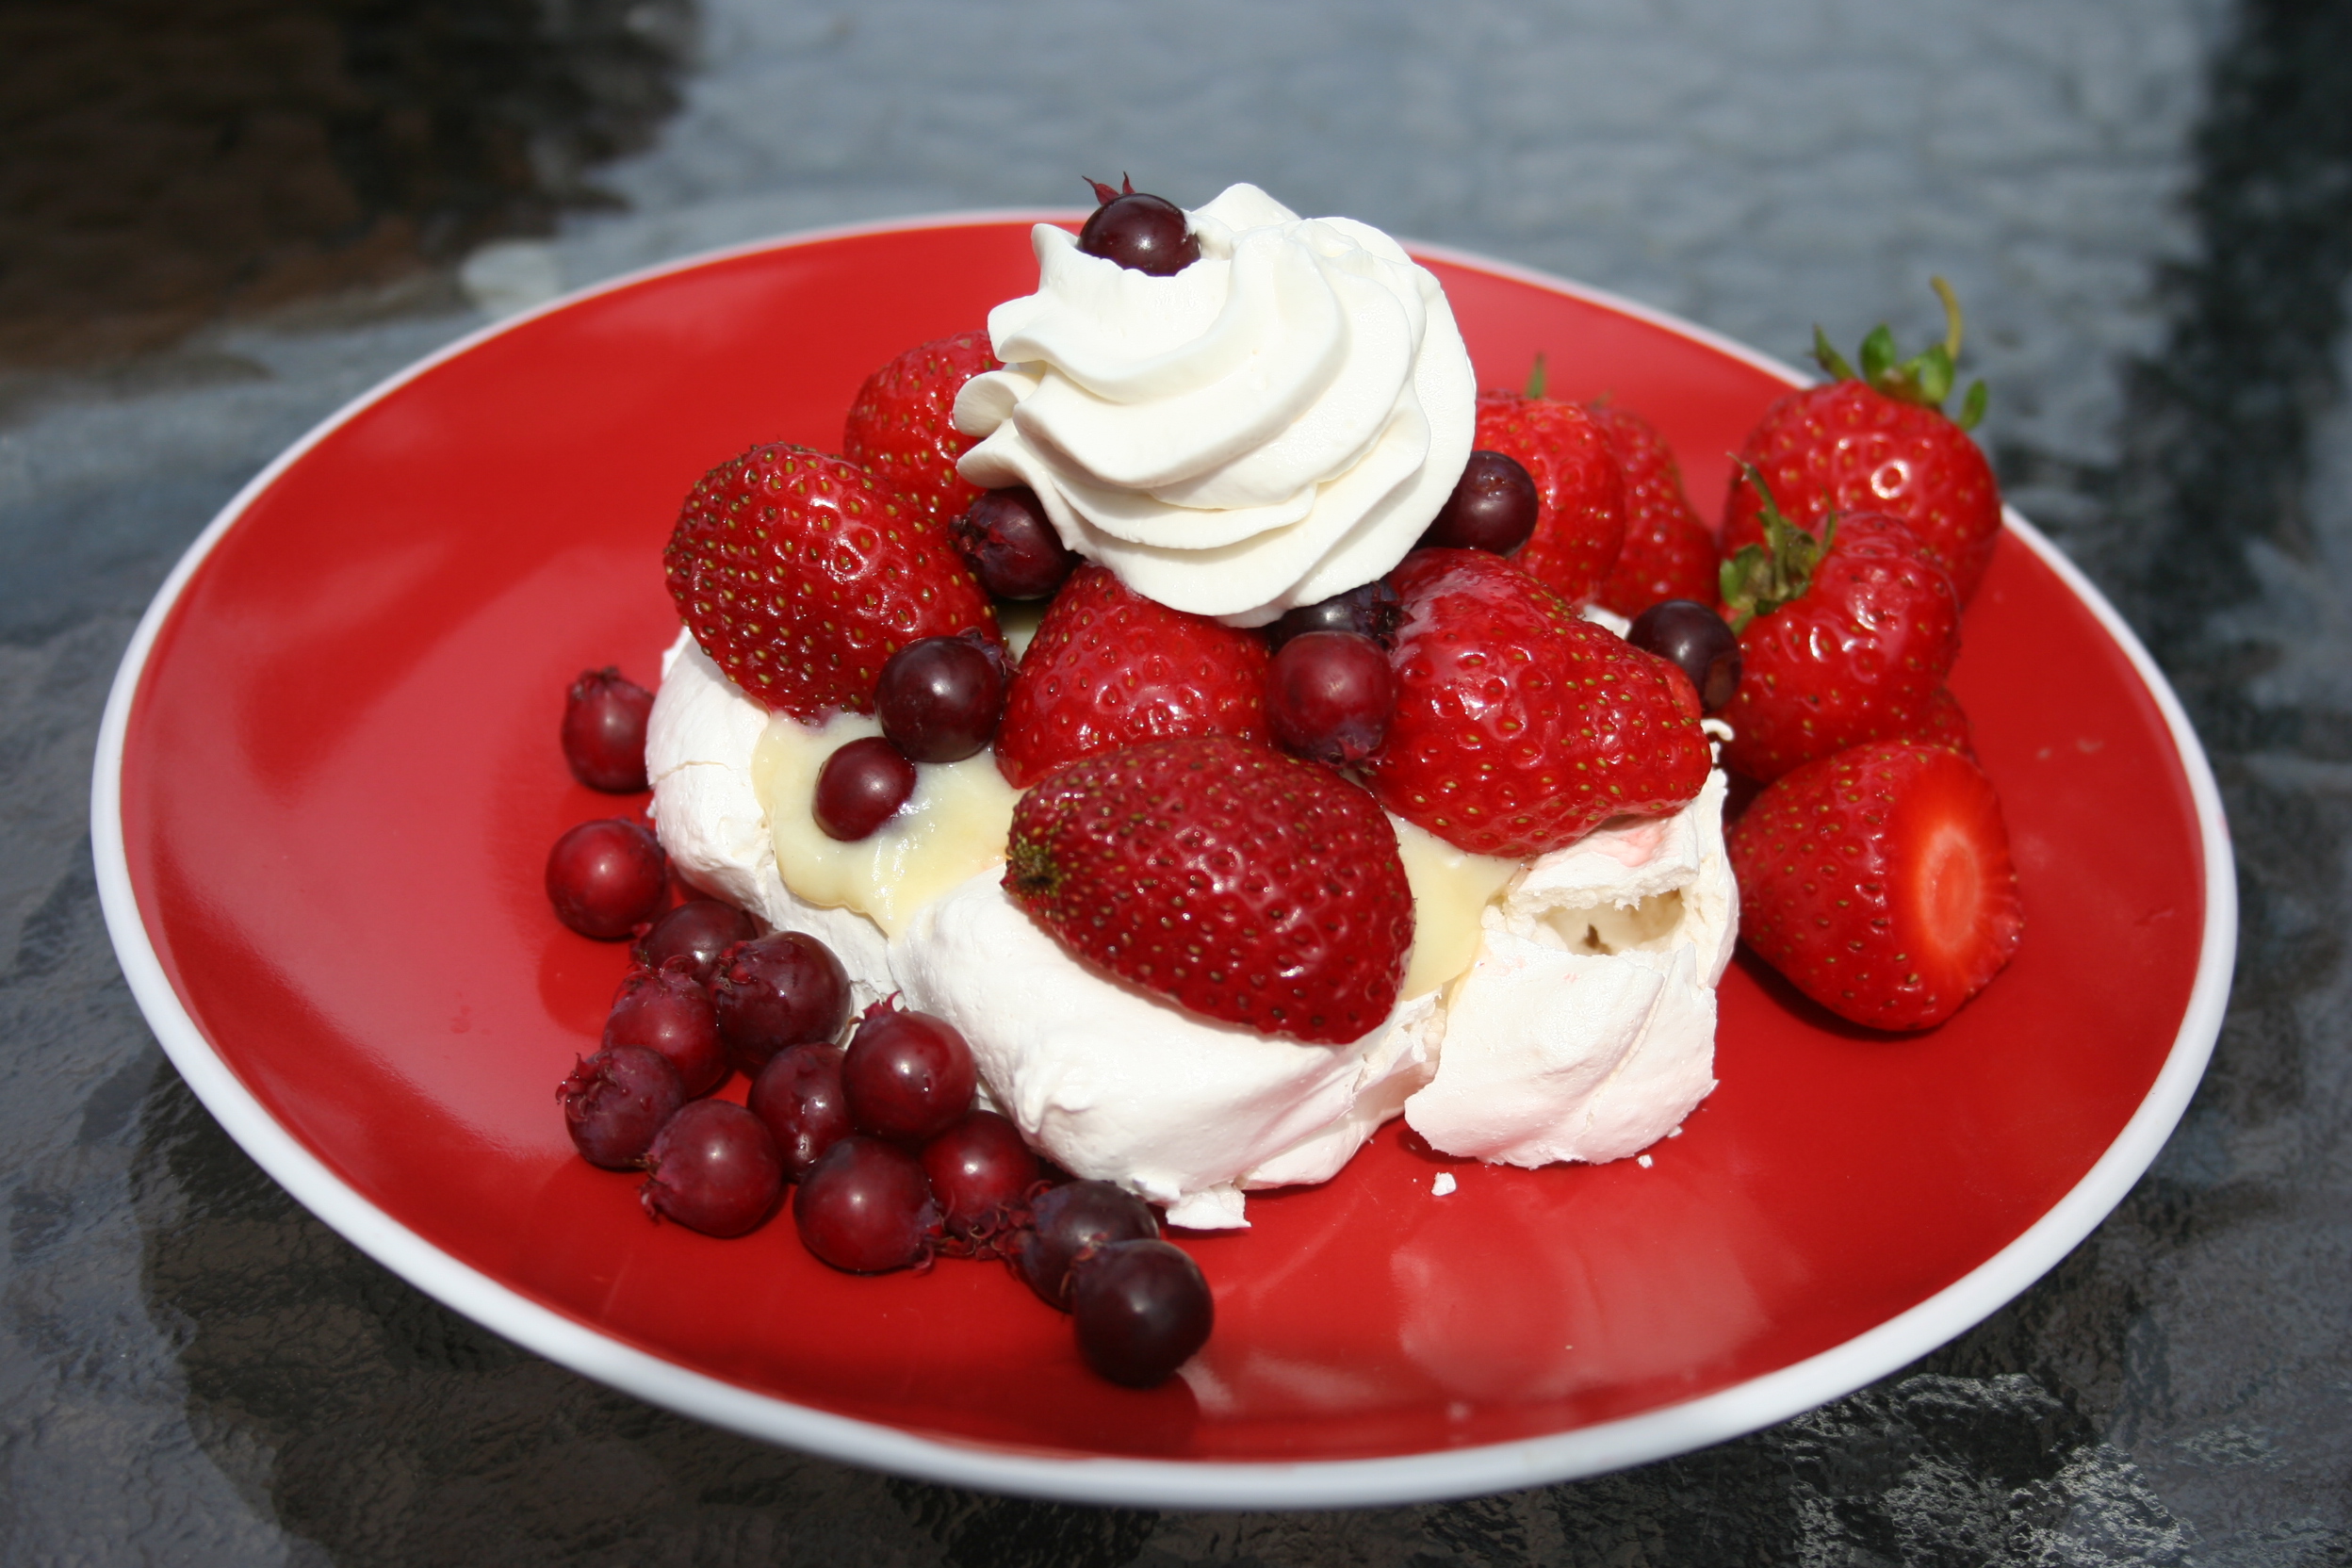
I think this is the ultimate Canada Day dessert with it’s red and white colour scheme and local berries at their peak! You can make individual or family size meringues and they are so portable for picnics or potlucks or camping. Put them together when you are ready to serve! Use a handy can of whipped cream if you are not at home.

This morning I was able to spend time at our local berry patch, Morrison’s Berries, http://ontariofarmfresh.com/member-pages/morrison-berries-country-market/ listening to the birds and enjoying the summer holiday while picking a basket of strawberries. I seldom pick more than 6 quarts of berries at a time. That way I have an excuse to go again and again and it does not become a chore. To make our pavlova even more of a Canadian treat we harvested our first Saskatoon berries from bushes in our gardens. They are really abundant this year and taste like a cross between a currant and a blueberry and I think they will mix in nicely with the strawberries on top!

Meringues BakedSaskatoon Berry Bush

Pavlova– Click here for pdf version of recipe

Meringue:
3 egg whites, preferably room temperature
1/4 tsp cream of tartar
3/4 cup white sugar
1/2 tsp vanilla extract

Custard: This recipe makes enough for 2 batches of meringue or a Strawberry C  ream Pie
1/2 cup white sugar
3 Tbsp corn starch
1/4 tsp salt, or less
2 cups milk
3 egg yolks
2 Tbsp butter or margarine
1/2 tsp vanilla extract

Topping:

Strawberries as desired, about 1 1/2 quarts washed and hulled
Sweetened whipped cream Meringue:

Whip egg whites and cream of tartar in a clean bowl with clean beaters until soft peaks form.
Gradually beat in sugar until stiff peaks form then stir in vanilla.
Spread all of meringue in a circle on parchment*lined baking sheet using a spoon to smooth and indent the centre slightly. I have also made individual meringues using a muffin scoop. This will make about 7- 8 individual forms.
Bake at 250°F for 45 -60 minutes until dry and firm. If you are not certain if it is quite done you may shut the oven off and leave it in until it cools
Custard:

Mix sugar, corn starch and salt until corn starch is evenly distributed to prevent lumps. Whisk in milk and microwave on high for 6 – 9 minutes, stopping to stir every 3 minutes When mixture has come to a boil and started to thicken add egg yolks putting a bit of the
hot mix into the yolks first to temper them.
Return to microwave and bring back to a boil, about 2 minutes.
Remove and add butter and vanilla, stirring until smooth.
Place a piece of waxed paper or plastic wrap on top to keep from forming a skin and let cool.Cover baked meringue with cooled custard and berries. Top with a little sweetened whipped cream.

Anne’s Favourites Serves about 6

* You may use foil instead but lightly grease it before spreading meringue.

Fruity Oat Muffins

Fruity Oatmeal Muffins 007

I have made dozens and dozens of muffins over the years, most of them for coffee breaks at our business, Cliff’s Plumbing & Heating. Surprisingly people have continued to eat the muffins provided without complaint even when they have been transformed into the gluten-free versions. It gives me a chance to experiment with adaptations without wasting the end product.

I have found that a number of my favourite muffin recipes translate seamlessly with a substitution of my GF all purpose flour mixture and xanthan gum at a ratio of 1 tsp to every 1 ½ – 2 cups of flour. Sometimes I add an extra egg for some of the liquid if that looks like an option in the ingredient list. The recipes that are a candidate for this substitution are the ones with fruit in them so I tried changing fruity bran to fruity oat and was quite happy with the results.

I noticed that gluten-free muffins and cookies often improve after a day or two so I thought the batter sitting before baking might be beneficial also. Whether if actually helps or not it is nice to have a muffin you can mix once and bake as needed!


Fruity Oat  Click here for the pdf version of the recipe

Fruity Oat Muffins
2 1/2 cups GF all purpose flour
1 cup white sugar
1/4 cup brown sugar, packed
2 tsp xanthan gum
1 Tbsp baking soda
1 tsp GF baking powder
1/2 tsp salt
1/4 tsp allspice or 1 tsp cinnamon
grated rind of one orange
1 1/2 cups dried fruit – any combination of apricots, prunes, dates, etc.
2 cups GF rolled oats, quick cooking or large flake
1/2 cup orange juice *
2 cups buttermilk
1/4 cup applesauce
1/2 cup canola oil
2 eggs
Sift flour, both sugars, xanthan gum baking soda, baking powder, salt and spice.
Stir in orange rind and dried fruit mixture to coat.
Mix together rolled oats, orange juice, buttermilk, applesauce, oil and eggs.
Refrigerate overnight for flavours to blend but can be used immediately also.
Fill paper-lined muffin pans using a 1/4 cup measure or a 2 1/4 ounce scoop.
Bake at 365°F for 30 minutes.
Makes 22 muffins
*Use juice from the orange you’ve already taken the rind from and fill measure with regular juice, yogurt or buttermilk.

Butter Tarts and Blossoms

GF PastryButter Tarts GF

Once a year I make tarts for the Horticultural Society Soup and Sandwich lunch and make enough extra for Cliff’s Plumbing and home. This year it worked out particularly well because I thought I need to update the butter tart photo on my blog to a gluten-free version and this gave me the opportunity. I recall counting butter tarts as one of the blessings that was naturally gluten-free when I first began my diet. I do not indulge often but it is good to know I can still add them to a special picnic or camping trip when I want to and they are just as decadently delicious as always!

At first I made the “gluten-free” pastry but now I just make my regular pastry with gluten-free all purpose flour and by using plastic wrap to roll it I am able to manage quite nicely. Thanks to Jenn Croft in Owen Sound for the idea to do that! If you do not have your own favourite pastry recipe you may try this one. GF Pastry – Click for pdf copy of recipe

Butter Tarts – Click here for pdf version of recipe

GF Pastry for 30 tart shells
2 cups brown sugar, packed
1/2 tsp salt
1/2 cup melted butter*
1/2 cup corn syrup
3 – 4 eggs, depending on their size, I usually use 4
raisins, walnuts or coconut to taste

  • Mix brown sugar, salt, melted butter and corn syrup.
  • Whisk eggs then stir into brown sugar mixture being careful not to beat. If you get too much air in the mixture some of the tarts may seem hollow when baked. 
  • Place raisins, nuts, coconut or a mixture of these in the tart shells then cover with butter tart filling to 3/4 full with a 7/8 oz scoop if you have one.
  • Bake at 400°F for the first 10 minutes then reduce heat to 350°F and continue baking 
  • for another 15 – 20 minutes or until filling is set. 
  • If you like your tarts runny you may take them out a little early or reduce the number of eggs to 3.
  • Makes 27 – 30 large tarts

*I would not substitute margarine here.
Anne’s Favourites